Tech Talk: Learn How to Properly Pack for the Road
Posted on December 2, 2011Written by Mike Graham, product manager for CHAUVET Professional
You just picked up a rental package of lights from CHAUVET. But do you know how to get them out for rental, and more importantly, back again in one piece? Can you just keep them in the box and hope for the best? How about cables? How do you keep track of cables, how do you wrap and pack them?
As part of being organized, I always keep a list of what is in each box. I always know how many 10-feet 5-pin DMX cables I have and I pack a few in plus, just in case. Also, I pack some extra power cables, a few plugs and 3- to 5-pin turn arounds? I like to make note of anything that did not work on the show site so that when I get back to the shop, I can easily find it and get it fixed. These are just some quick tips; read below and get organized like a pro:
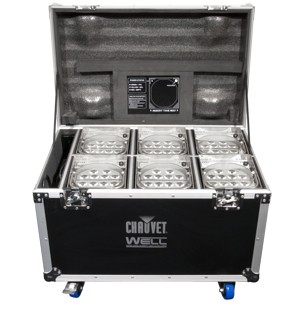
 1. Packing products. Let’s use the COLORado series of products for our examples. While they are completely road worthy, they still need a little protection from the rigors of road travel and from riggers. These fixtures are – with the exception of the COLORado Ridge IP and COLORado Range IP – fairly small in size, so you can pack multiples in one case. If you have PAR-style units, a case of six or eight is the way to go. With the batten-style units, you may be able to do many more depending on the style of case. Casing the units keeps them safe and helps you keep track of your inventory. This applies to moving heads as well. The lighter and smaller the fixtures, the easier it gets to pack more into the same case. The Legend 412 is a great example for this – it can be cased easily into an eight-pack.
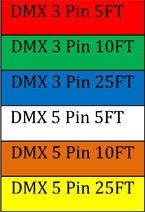
 2. All about cables. Nothing is worse than getting to a show and seeing that the cable trunk looks similar to a steaming hot colander of cooked spaghetti. Keeping them organized is not as hard as you think. CHAUVET DMX cables come with color-coded shrink tube on both ends of the cables for easy sizing. Check the picture at right for CHAUVET’s color coding.
- Handling new cables. When you buy a new set of cables, it is really important to take them out of the package, roll the cables out and get the wind memory out of them. When DMX cables are built at the factory, typically they are rolled off a big spool, have the ends soldered on, and then get wound back up on the packaging card. That is why when you buy new cables they unroll like a big spring. To release the memory, I grab the head of the cable in my left hand and pull it through my right hand tight enough to let the cable pass, but at the same time spin out the twists in the cable. Once you are done, the cable should lay flat on the floor. This will let you roll the cable back up and not have it look like a figure 8.
 Tying up cables.
Zip Tie. This works very quickly, but they burn up fast and that can get expensive. Also if you don’t have a set of cutters handy, getting the Zip Tie off is going to be a challenge for your teeth.
Electrical or Gaffers tape. This is quick again, but you might end up with tape on your shoes, and I personally hate tape on my shoes.
Trick line or Velcro tie. This can be attached to the cable permanently and allows you to use the tie again for cleaning cable on the truss
Fold over and tie the cable back on itself. Cheep and dirty way to have your cables not last too long. Tying a not in the cable is not a good plan.
- How to roll cables. So pick a method and roll up the cable. I am really picky about how people roll cable, and this is my advice: never roll over your elbow. It creates memory in the cable and will eventually break the stands of copper in the cables. Since I am right handed I grab the head of the cable in my left hand and make loops that are about 1 foot across. There are two schools of thought on wrapping cable: over-under or all-over. Over-under means that you alternate the loops so that one loop is over the top, and the next loop is wrapped underneath. All-over means that you are wrapping the cable all over each other. Both methods are acceptable. However, if you unwrap the over under method the wrong way, you will see that every loop is now a knot in the cable.
 Stacking cables. Once you have all of your cables wrapped up and color coded, you can start stacking them up in the case. One case for data, one for power extensions, one for motors, and one for power distribution. You want to keep these all separate as they are typically used at different times of the load in. You also want to make sure that you pack in order. For example, make sure that your feeder cable for your power distribution system is on top the rest of your power distribution cables. You are going to need them first and there is nothing worse than having to dig to the bottom of a case full of heavy cable only to have to put it back in once you have your feeder cables.
So now you have your cases packed and you’re ready for your show. (For a list of tools, click here and follow the advice I gave in a different blog.) You know how to be in charge of your equipment and how to stay organized. There’s one thing left to do: enjoy what you do and have fun!
